Dante Audio Networking: 3 Methods To Combine Dante & Control
When working with Dante audio networking and control networking, there are a few different options to consider when going from your network switch to your amplifiers. Here, we have outlined each method and even provided a quick walkthrough guide to help achieve different modes.
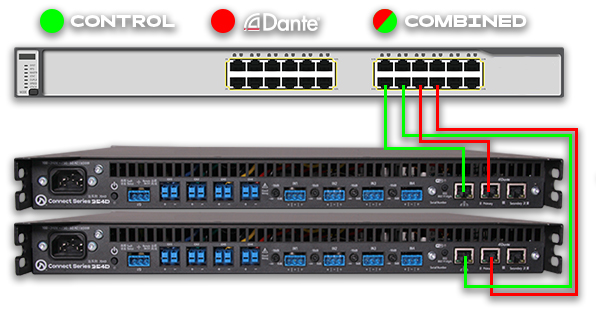
Dante in Switched or Redundant Mode
Dante Audio Networking: 3 Methods To Combine Dante & Control
The first way to connect requires two network cables connected to each amplifier going into the same switch. It does require the most cables of the three ways described here, but it is the only way that allows for Secondary Dante to create a backup Dante network. This method can also be used with Dante configured in Switched network mode, however you will not have the ability to run Secondary in this setting.
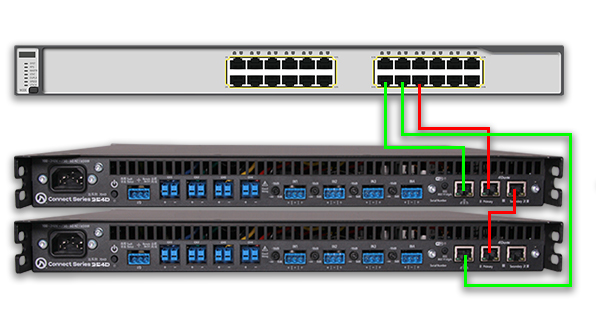
Dante in Switched Mode - Daisy Chained
Dante Audio Networking: 3 Methods To Combine Dante & Control
The second method requires Dante to be configured in Switched network mode. This allows for the Dante to be “daisy-chained” from amplifier to amplifier while only having one total Dante network cable connected to the switch. It still requires a control network cable from each amplifier up to the network switch but this will utilize less ports on the network switch than in the first solution here.
Dante Audio Networking: 3 Methods To Combine Dante & Control
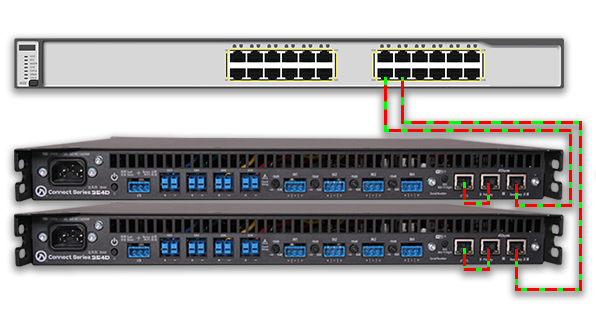
The third method also required Dante to be configured in Switched network mode. In this case a short network cable would connect the Control network port to one of the Dante ports directly next to it right on the amplifier. This combines the Control and Dante together right at the amplifier. From here you would then connect another network cable from the remaining Dante port up to the switch. This utilizes the fewest ports on the network switch but again doesn’t allow for a secondary Dante network with the amplifiers.
If you have any question or feedback about Dante audio networking or control, feel free to leave them in the comments below or reach out to us on our social media channels.
Want more LEA content delivered directly to your inbox? Enter your email address below to be subscribed to our monthly newsletter and keep up with all of the latest news and content from LEA Professional.
This website uses cookies to improve your experience. We'll assume you're ok with this, but you can opt-out if you wish.AcceptRejectRead More
Privacy & Cookies Policy
Privacy Overview
This website uses cookies to improve your experience while you navigate through the website. Out of these, the cookies that are categorized as necessary are stored on your browser as they are essential for the working of basic functionalities of the website. We also use third-party cookies that help us analyze and understand how you use this website. These cookies will be stored in your browser only with your consent. You also have the option to opt-out of these cookies. But opting out of some of these cookies may affect your browsing experience.
Necessary cookies are absolutely essential for the website to function properly. This category only includes cookies that ensures basic functionalities and security features of the website. These cookies do not store any personal information.
Any cookies that may not be particularly necessary for the website to function and is used specifically to collect user personal data via analytics, ads, other embedded contents are termed as non-necessary cookies. It is mandatory to procure user consent prior to running these cookies on your website.